Item, के खरीद या बिक्री को बार बार Update(संसोधन) करते समय स्टॉक में अंतर दिख सकता है।
इसे ठीक करने के, जब Cursor Item की Qty पर हो तो F9 key दबाएं (या Funtion Key 'Fn' के साथ F9),
Stock Adjustment पैनल खुलेगा स्टॉक को Adjust Qty में बढ़ा कर या घटा कर Save कर
सही मिलान कर सकते है, Stock adjustment पैनल को Close कर देंगे।
अब दुबारा Item का नाम लिख कर सेल करते समय स्टॉक सही दिखेगा।
Sales Panel
(1): On Front Panel > Click or Press Enter on Sales
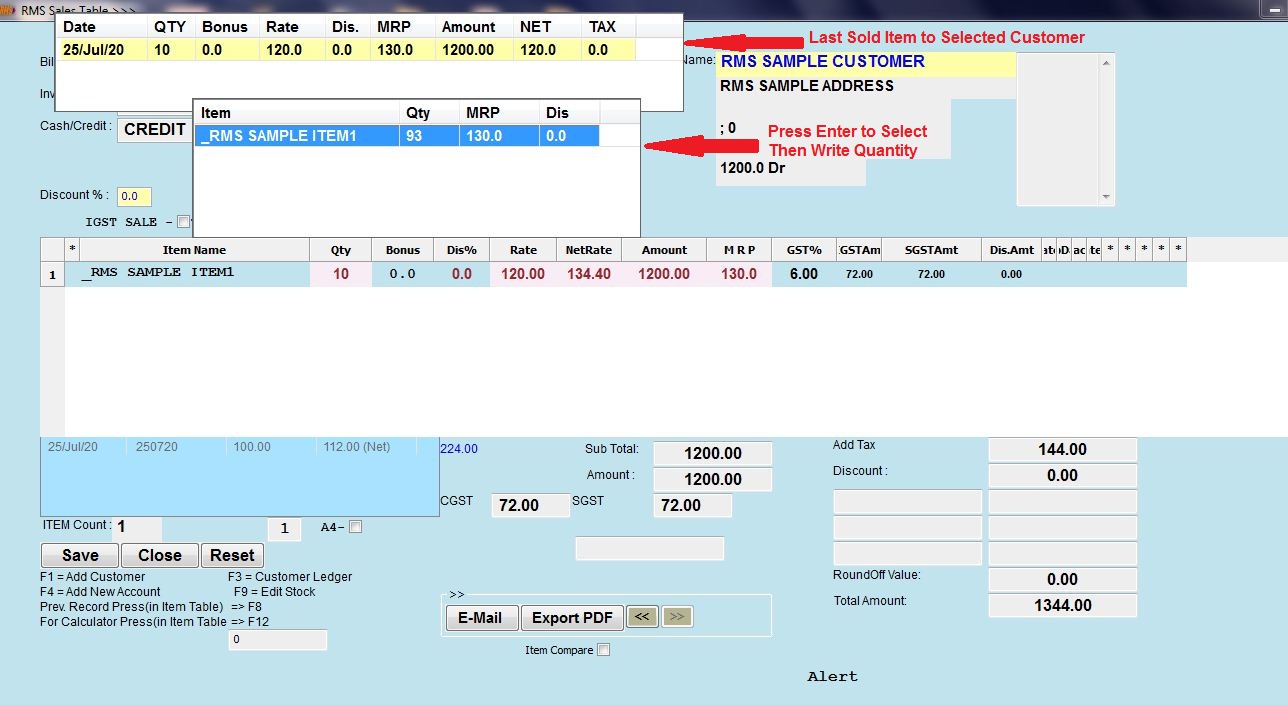
(2): Press Add Button >> This will Activate Sales Panel and
     Add Button will Disappear.
(3): Write Bill Dates or Use Current Dates >> Press Enter
(4): Invoice Number Will Automatic in Sales
(5): Select CASH or CREDIT Bill >> Give Default Discount (will apply discount on
     All items on in current bill ) >> Press Enter
(6): Write to Search Party Name >> Move Cursor UP/DOWN Key for selection >> Press Enter
(7): Write to Search Item Name >> Move Cursor UP/DOWN Key for selection >> Press Enter
(8): Cursor Will Move for STOCK Selection >> Select >> Press Enter
(9): Write Qty (Quantity) Press Enter >> Write Bonus(if any) Press Enter >> Write Rates
     (** Rate A means Price to Retailers, if you have frenchise like bussines)
(10): You can directly Edit NetRate (Net Rate is Calculation after TAX, BONUS, DISCOUNT)
     Press Enter >> After NetRate Column Cursor will Move to NEXT Row, if Row is not visible then
     RMS will create NEW ROW >> Search For NEXT ITEM ;
(11): If billing Item is Finished >> Press TAB key >> Cursor will move to bottom right ;
     if you want additional charges on bill then write here otherwise press TAB/Enter key >>
     Cursor will move to comment Field (Bottom Left, just above SAVE Button);
     Write comment/remark if any >> Press Enter >> Cursor Moves to SAVE Button >>
     Press Enter and SAVE Bill >> After Saving Bill Print Message will appear (in Sale Only)
     Press ESC or 0 if you don't want to take PrintOut.
    ShortCuts :
    (a): When Cursor on Party Name: Press F1 Function key will Open Account Panel.
         You can create Accounts of Customer or Suppliers SAVE and Close will automatically
         back to current work.
    (b): When Cursor on Item Name (Purchase Only) :
         Press F1 Function key will Open ItemEntry Panel.
         You can create Items here SAVE and Close will automatically back to current work.
         When Cursor on Item Name (Sales Only) :
         Press F1 Function key will Open ItemEntry Panel.
         You can search for items about its description, rack or hsn >> Press ESC >>
         Back to current work.
    (c): When Cursor on Qty (in sales Only):
         Press F9 Function key will Open STOCK ADJUSTMENT Panel >> Edit Stock > Savel > Close >
         Back to current work
         Press SPACE BAR on Keyboard will Open Stock List (with Batches) to select angain >>
         Press Enter.
         Click on Radio Button 'Item Compare' on Bottom of Panel >> now Write Quantity >>
         Will Show Item comparison of Last 3 Purchases at right bottom side of panel
    (d): When Cursor on any one of Rates, Bonus, Dis Press F8 Function Key will Show
         Last Billing of Selected Item on Previous Item Display List on Top Left.
     बिल बनाते समय जब Cursor Qty पर जाता है तभी CTRL+R Key (KeyBoard पर) एकसाथ दबाएं
      CTRL + R के एकसाथ दबाते ही Item का नाम और row RED कलर का हो जायेगा,
      अब वापसी ली गयी Qty भरें,  QTY की Value, Total बिल Value में से कम होती चली जाएगी
      वापसी भरी गयी Qty के बाद केवल वापसी ही भरी जाएगी, नयी Qty न भरें ।
    SALE करते समय Qty अगर दुबारा Edit करनी पड़े तो,
    Cursor को QTY पर ले जा कर Space Bar दबाएं Batch List दुबारा खुल जायेगा और सभी Values Refresh हो जाएँगी ।
    इस तरह/(QTY पर Space Bar का उपयोग करने पर)  SALE करते समय STOCK में कभी भी अंतर नहीं आएगा ।
   (1): यह सुनिश्चित करें की आप के Computer में Adobe या Foxit Reader Install हो
     और वो डिफ़ॉल्ट व्यूअर (Default Viewer हो)(Default Viewer मतलब किसी भी .pdf फाइल को
     क्लिक करने पर वो फाइल Adobe या Foxit Reader में ही खुल जाये। )

   (2): Device and Printer पर जाएँ, अपना प्रिंटर चुने, इसी विकल्प पर mouse
    का फोकस लेकर mouse का right click करें और कई विकल्पों में ऊपर की
    तरफ 'Set as Default Printer' के सामने सही का निसान बनायें(Select करे)

   (3): यही पर ही फिर से mouse का फोकस लेकर mouse, का right click करें और
    कई विकल्पों में से एक (ऊपर से नीचे की तरफ तीसरा विकल्प Printer Properies चुनें )
    एक Box खुलेगा जिसमे PORT विकल्प चुने ; अब PORT का नाम लिखें जैसे : LPT1, USB001
    अगर Rate के कॉलम में पुरे पत्ते (Strip) की Rate आ रही है तो उसे प्रति Tablet की Rate में
    बदलने के लिए Rate के कॉलम में दुबारा पत्ते (Strip) की रेट लिखनी होगी, दुबारा रेट लिख कर
    Enter Key दबाने पर अपने आप रेट प्रति Tablet में बदल जाएगी

    *** लेकिन जब Rate Edit करेंगे तो Rate कॉलम की Cell का BackGround हलके पीले रंग का हो जायेगा,
        तभी रेट convert होगा अन्यथा Cell Freez(रूक जायेगा) हो जायेगा, और Edit नहीं होगा
        इसका ध्यान रहे बहुत जल्दी से एडिट करने पर Cell Freez  हो जाता है और edit नहीं हो पता
        Cursor Rate कॉलम में Rate लिखने पर Cell Freez हो रहा है तो Mouse ले जाकर Click करें
        BackGround हलके पीले रंग का हो जायेगा और आप रेट लिख कर Enter Key दबाएं,
        पत्ते (Strip) का Rate प्रति Tablet की Rate में बदल जायेगा ।